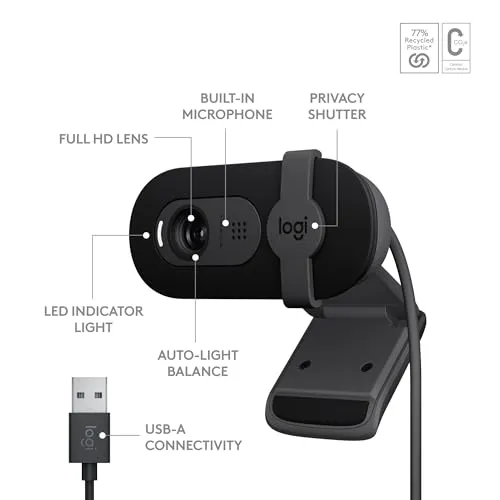
Logitech's Brio 90/100/101 mounting article labels six parts on the camera. They are the lens, the LED, the built-in microphone, the universal mounting clip, the privacy shutter and the USB-A connector. Logitech Brio 101 troubleshooting can follow those parts in turn. It starts at the plug and ends at the shutter.
Most fixes come from Logitech's Brio 90/100/101 articles, which cover the three cameras together. The Brio 101 spec sheet and setup guide add this camera's own figures and steps. Picture quality, the mic and how the camera compares get their own coverage in our full Logitech Brio 101 review.
Key Takeaways
- Connect the USB-A plug directly, or through a hub, dock or adapter that carries power and video.
- Open a call or camera app before judging the LED, since it stays dark until an app starts the camera.
- Switch a camera that Device Manager flags with a yellow exclamation point to the USB Video Device driver.
- Check the call app's HD setting first when a call stays below 1080p.
- Set anti-flicker in Logi Options+ to NTSC 60 Hz in North America or PAL 50 Hz in the EU.
- Slide the privacy shutter fully left to right without covering the built-in mic.
Logitech Brio 101 troubleshooting at the USB-A plug
A fixed cable carries the USB-A plug. Logitech's Brio 90/100/101 article on the cable says you can't change it. The Brio 101 spec sheet lists an available USB-A port under its system requirements. It also names Windows 10 and higher, macOS 10.15 and higher and ChromeOS as compatible systems.
Connect the plug directly to a port on the computer. Logitech warns that the camera may not work properly through a USB hub. If you still need a hub or an extender, its USB-A port must support both power and video. The same goes for a docking station with a USB-A port and for a USB-A to USB-C adapter. However, some adapters carry power only, and a computer on one of those won't recognize the camera.
Still at the plug: Device Manager and System Report checks
Give the camera a few minutes after plugging in. If the computer or a call app still can't find it, Logitech's shared BRIO article checks the connection first. Seat every cable tightly. Then take any hub or extender out of the path, since some may lack the power the webcam needs. Logitech's general webcam advice also suggests another USB port. If the camera sits in a USB 3.0 port, usually the one with a blue insert, try USB 2.0.
On Windows, search the Start menu for Device Manager and confirm that the camera is listed. If the camera isn't there, try another USB port and check that Windows Update is on. A yellow exclamation point beside the camera, or an UNKNOWN device, flags an issue. Right-click that entry and select Update Driver, then open the list of drivers this PC already has. Turn on Show compatible hardware and choose USB Video Device, not the Logitech BRIO entry. Then click Next. A list of categories may appear at that step; find USB Video Device under its category.
If the camera appears with no yellow mark, make sure it has the latest driver. Choose Update Driver, then Search automatically for updated driver software, and pick the Logitech driver it finds.
On a Mac, open System Report, which Logitech's article reaches through the Apple menu and About This Mac. A camera that macOS recognizes shows up under Camera with Logitech's BRIO name. Older Mac versions may list it as Logitech Camera, and then that is the device to select.
The LED: dark until an app opens the camera
Expect a dark LED at plug-in. The Brio 101 setup guide says the LED shows when the webcam is on and in use by an application. Logitech's Brio 90/100/101 LED article gives one state: solid white while the camera captures and streams video and audio. So open a call or camera app before reading a dark LED as a dead camera.
The lens: fixed focus and a 58.9-degree view
First, check which camera the call uses. Logitech's Brio 90/100/101 article on odd-looking video has you confirm that the picture comes from the Brio, not a laptop camera or another attached camera.
The Brio 101 spec sheet gives the lens fixed focus and a 58.9-degree diagonal field of view. Its video modes are 1080p and 720p, each at 30 frames per second.
You frame the shot by hand. Following the setup guide, place the webcam on the laptop, monitor or computer at the position or angle you want. Then tilt it up or down until you sit within the camera's view.
The lens again: when a call stays below 1080p
Begin with the call app. Logitech's Brio 90/100/101 article on resolution says some video conferencing apps support only up to 720p. Others hold a setting that puts the video into HD quality. Check the app's requirements and settings as well.
The same article then names three more checks outside the camera. USB bandwidth runs short when many USB devices work at once, and tasks such as file transfers or antivirus scans load the CPU. The connection should also download at 3 Mbps or faster. For the first two, Logitech's article on odd-looking video gives the remedy: disconnect unused USB devices and close programs you don't need.
The Brio 101 spec sheet also asks for at least 2 GB of RAM for 1080p streaming. To rule out the network or the call service, test the picture locally. Logitech's example is the Windows 10 Camera app.
The picture it sends: Logi Options+ settings
Logitech's Brio 90/100/101 software article names Logi Options+ as the best software for these cameras and links its latest version. Options+ 1.56.474970 (Windows, 2023-10-25) let you change auto exposure, shutter speed, ISO and low light compensation on the Brio 101. Since 1.62.520356 (Windows, 2024-02-05), a webcam preview appears right after you select the Brio. Those release notes also said the latest Options+ at the time needed Windows 1903 or later. When Options+ doesn't detect the camera, Logitech's shared BRIO article runs the plug checks above.
Logitech's Brio 90/100/101 article on a picture that looks darker or lighter than expected starts in Options+. Adjust brightness, contrast, saturation and sharpness there, and turn off auto white balance and auto exposure if you want to. If that doesn't fix it, add light in front of you, natural or artificial. You can also sit closer to the camera. Logitech suggests 30 inches, then closer or further to see what works best. An overexposed picture calls for auto exposure off and the Exposure bar set by hand.
Flicker has its own fix: the anti-flicker setting in Options+. Logitech's Brio 90/100/101 article on flicker says the camera should run in sync with your lights. Choose NTSC 60 Hz, typically best in North America, or PAL 50 Hz, the better fit in the EU. For a grainy or noisy picture, Logitech's general webcam article starts with more light. It adds that better light helps with blur during quick movements.
The clip: secure on top and flush at the back
Logitech built the mount for a variety of screens and monitors. Its Brio 90/100/101 mounting article says to adjust the mount until the camera rests securely on the monitor. The setup guide then adds the monitor step. Adjust the webcam so the end of the universal mounting clip rests flush against the back of your device.
The privacy shutter and the mic beside it
The camera has an integrated privacy shutter. To open it, slide it gently left to right, all the way across, as the setup guide describes. The same step carries a caution: make sure the shutter doesn't cover the built-in microphone. Logitech's spec sheet also lists that mic as mono, with a range of up to 4 ft (1.22 m).
A second computer, then Logitech's support team
Logitech Brio 101 troubleshooting ends on a different computer. When the camera stays invisible there too, Logitech's general webcam advice warns that it may be defective. For an issue that remains, Logitech's shared BRIO article points to its support team. Logi Options+ also has a Feedback option under Settings for reporting it. The Brio 101 warranty page lists a 1-year limited hardware warranty.
Some traits come with the design. Logitech lists fixed focus and a 58.9-degree diagonal view for this lens. The setup guide frames the shot with a manual tilt. If that view is tighter than the desk needs, look to our ranking for a wider-view webcam.
Conclusion
Logitech Brio 101 troubleshooting goes part by part. At the plug, connect directly or through a hub, dock or adapter that carries power and video. Read the LED only with an app open. For a call below 1080p, check the call app, then the computer's load. Next, tune light, color and flicker in Logi Options+. Seat the clip flush and keep the shutter clear of the mic. Should another computer fail to find the camera too, contact Logitech's support team.
Frequently Asked Questions
Why is the Brio 101's LED dark after you plug it in?
The Brio 101 setup guide says the LED shows when the webcam is on and in use by an application. Logitech's LED article lists solid white while the camera captures video and audio. Open a call or camera app, then check the light.
What should you check when the computer doesn't recognize the Brio 101?
Start with the connection, as Logitech's shared BRIO article does. Seat every cable tightly and connect the camera to the computer itself, skipping any hub or extender. Then check that Windows Device Manager lists the camera, or look under Camera in a Mac's System Report.
Can the Brio 101 work with a USB-C-only laptop or a dock?
Yes. Logitech's Brio 90/100/101 articles allow a docking station with a USB-A port or an adapter, as long as it supports both power and video. Some adapters carry power only, and the camera won't work through those.
Why does a call show the Brio 101 below 1080p?
Logitech points to the call app first, since some apps support only up to 720p and others need their HD setting switched on. After that, check USB bandwidth, processor load and a download speed of 3 Mbps or faster.
How do you stop the Brio 101 picture from flickering?
Change the anti-flicker setting in Logi Options+ to match the frequency of your lights. Logitech lists NTSC 60 Hz, typically best in North America, and PAL 50 Hz, the better choice in the EU.
What helps when the Brio 101 picture looks too dark?
Start in Logi Options+ and adjust brightness, contrast, saturation and sharpness. If the picture stays dark, Logitech suggests more light in front of you. Sitting closer can help too, starting at about 30 inches.